Wednesday 27 November 2013

Graze {A Free Gift For You}


 Okay, so this is first post for what… over a week. Trying to finish writing a novel is my only excuse right now. Sorry. So I'm kind of pleased that this post will help me feel better and more like a good blog writer who keeps it all up and inspirational, and hosts giveaways. Because this is better than your average giveaway… everyone gets something. Something yummy and fun from graze.com!
Let me explain. Graze is a company which sends lovely boxes of better-for-you snacks in the mail so that you can enjoy them at home or work, or send one to someone you love. There are 100 small nibbles to choose from: seeds, nuts, dried fruits and chocolate mixes, dippers, heather cakes (that come with a tea blend made to go!) and the graze brownie. You receive four different snacks in each box and can control which ones you are sent by rating the foods as to weather you hate, like, or love each one.
So, for the good part: you can get one free box when you sign up using my friendcode!
Just click here to get your free box. Complete the sign up process to receive a little gift from me!


Disclosure: When you sign up you will have to give card details though they won't take any payment from you. Graze will automatically send you weekly boxes which you will be charged for unless you cancel deliveries after you receive your first box, which is fine. I have not been sponsored or asked to write this, just thought I'd share the love!

Thursday 14 November 2013

Popping in for some Cookies


I know, it feels like I've almost abandoned my poor blog! I've just been writing my novel in every spare moment I have and wanting, hoping to get it done in time. However, I'm still doing my weekly bake, and this time, I wanted to make cookies. I wanted to make my favourite recipe for oat and raisin cookies from the Hummingbird Bakery Cookbook. But we had no butter, so I googled for a fat free cookie recipe instead. I found this recipe for Fat-free Oat and Raisin Cookies from Cooks.com. They were fairly quick and simple to make and tasted really good! They are more puffy and biscuity that cookies but still somehow a little chewy.


Here are my notes on the recipe:
  Recipe can be found here.
  Dairy and Fat Free!
  I tripled the recipe to suit our large family and cater for our guests and I got 24 cookies out of it.
  I added 1 1/2 tsp salt to the recipe, or 1/2 tsp if you are using the amounts given.
  I didn't know what Quick Oats were so I just blended Porridge Oats until they were fine.
  I used plain flour and soft light brown sugar.
  It was a very stiff dough, really hard for me to mix by hand so an electric mixer or food processor might be a good idea.
  Make sure you grease those tray! (My first batch stuck)
  375 degrees is the same as 190 Celsius.

Friday 1 November 2013

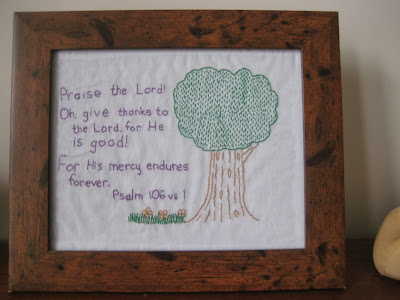
Embroidery {Psalm 106 vs 1}


During November I am trying to write a novel! Crazy, I know, but it was NaNoWriMo young writer's program that inspired me to do it. Because I am now going to be writing like crazy, I will not be able to post so regularly, so I'm starting off with some projects I've completed earlier and saved for a times like now! : )
I finished this embroidery in time for Mother's Day earlier this year as a gift to my mum. I really liked doing the embroidery, but like most of my gifts, it was a bit of a stretch to get it done in time! I worked on this watching a movie, at a friends house, and at any spare moment I got in my room. 


I can't remember why I picked this particular verse, probably just because I liked the words. It mentions the Lord in every line, and also his goodness and mercy. I hope it is reminder to praise the Lord and give Him thanks to everyone who sees it in our living room! My mum chose this nice frame, the glass of it measures 7.5" x 9.5" to fit the  fabric.


I chose a large piece of thick white cotton and used embroidery thread for everything except the tree, merely because I had no green embroidery thread! Using an ordinary (HB) pencil I lightly sketched the design onto the fabric after practicing a few times on paper. I started with the tree outline, then the words, and finished with the flowers at the bottom and the tree trunk detail. It is all done in running stitch, where a would sew around the word or an individual letter once, then go back and fill in the gaps. I used two or three strands of the thread and an embroidery needle. I put the fabric onto an embroidery hoop to make it easier to work with. I filled the tree top with simple (almost) straight lines of running stitch.  I'm sure there are many other stitch techniques that could work, I'm not saying this is definitely the way to do it! 


Here is the back, not very pretty, but I just wanted to show how I folded the edges in (to neaten the front and make it fit in the frame,) and then iron over interfacing to help it keep the right shape. It's really hard not to have a few wrinkles though!