Showing posts with label Gifts. Show all posts

Sunday, 11 May 2014

Gifts for a 3 year-old

This weekend my little sister turned 3 years old, and I've had fun buying and making birthday gifts for her. She is really easy and fun to buy for! Whenever she opened a present she would shout 'hooray' and 'thank you.' I wonder how long the sweetness will last...
I made a little list of things that would be good in a gift for her. Flowers, hearts, bows, pink, or other bright pretty colours are her favourite! I also wanted something she can use, wear, eat or something that makes her feel grown up. These do seem all quite stereotypical of little girls, but she does just really love pretty things!


This little skirt was very easy to sew: no pattern required! I've had this cute printed cotton for a while, it was fairly lightweight which is good for a little girl's skirt. Trying to take photos with a 3 year-old was fun, but she stands still for only a second before asking to see the picture!


To make the skirt, all you need is a rectangle of cotton fabric (measuring as long as you want the skirt and double as wide, plus on 1" extra on each edge) and a waist length of medium elastic. Fold the fabric in half and french seam the folded side and the side opposite it. Then hem the bottom of the fabric all around. Sew a deep hem along the top, leaving a 1" gap in the centre, through which you thread the elastic on a safety pin. Sew the ends of the elastic together, then pop it inside and sew up the gap. Arrange the fabric so that it is gathered evenly on the elastic. Ta-da... you've completed a cute little skirt!

I also brought this beautiful jewellery box in an online sale at Christmas. They don't sell it at the particular shop any more, but if you google 'Gingham Rose Jewellery Box' it is available elsewhere.


I hope your weekend was as fun as hers... if it really is possible to be as squealing-happyily-exited as a 3 year old on her birthday!)

Monday, 7 April 2014

Easter Inspiration

It's been a while ages since I last posted anything as I've been busy (yeah, you guessed it!), and I kind of forgot all about easter until I realised that we are on easter holidays for the next two weeks. So although I haven't made anything for a while, I have been storing up inspiration for you. The following post will be a bit of a mish-mash of pretty, easter-y things, from old favourite bakes to new craft ideas.

Painted Easter Bunny Jars- these look so cute and so effective! Paint and craft cute easter bunnies out of baby food jars and fill them with easter treats to give as gifts.

photo: dotcomgiftshop
Hand Painted Hanging Easter Eggs- another idea for a sweet easter gift, especially as they come in a cardboard egg box and you could hang them out in the garden for an egg hunt!

photo: magpie patterns
Chubby Chirps- use your leftover yarn to create a clutch of chicks nearly as cute as the real thing! They would make such cute easter decorations on the mantelpiece and lovely gifts.

photo: lakeland
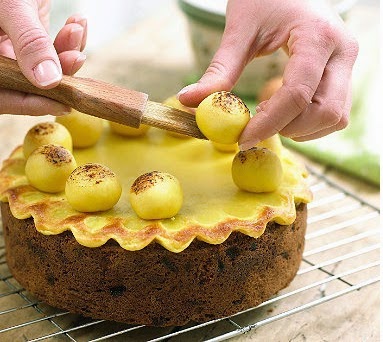
Simnel Cake- This is a recipe for a classic easter cake and a favourite in our house and I can't wait to make it again soon.

photo: soulemama
Gratitude Wrap- I know this isn't particularly easter themed, but I was really pleased to receive one of these from my mum a while ago, and I've got into writing letters and cards this spring. pdf here.

Saturday, 1 February 2014

Happy February!

Happy February to all blog readers and I hope you're looking forward to this month! This month I'm hoping to move into more art, craft, and sewing related posts and what a better month to start than the month of love! And because Valentines is on the 14th, and this is 14 things,  I've created an inspiration board with fourteen items from around the web to kick-start creativity. Check out for craft and card-making ideas, sewing tutorials, recipes, gifts ideas, and something for the home too!


Art:
Love One Another Art Print valentines art prints from jdc to brighten your home- jonesdesigncompany.com

Craft:
Valentine's Day School Lunch Notes free printable love notes- chickabug.com
(Check out their valentines store for more gorgeous printables!)

Card-Making:
Valentine's Wax Resist Card tutorial on my blog- 14-things.blogspot.co.uk

Fashion:
Butterfly Printed Silk Scarf any one of these beautiful silk scarves would make a lovely gift- uk.monsoon.co.uk

Food:
Rhubarb and Ginger Breakfast Muffins a delicious breakfast recipe for the 14th, or any day this month- keziacooks.blogspot.co.uk

Chocolate French Toast make your own chocolate chip artisan bread- simplysogood.com
and top with cream and strawberries- myweirdlifeunderarock.blogspot.co.uk

Valentine's Oreo Pops step-by-step photographic instructions for how to make these sweet treats- lilluna.com

Whale You Be My Valentine? whale cookie recipe and free printable treat bag labels- bakerella.com

Gifts:
Lip Gloss how to make lip gloss yourself- joythebaker.com

Knitted Hearts download this pattern for free and knit up some super cute and soft hearts- magpiepatterns.com

Home:
Floral Love Cushion
a beautiful cushion available in three colours- dotcomgiftshop.com

Sewing:
Heart-Shaped Pot Holders a charmingly cute pattern with instructions- marthastewart.com

Love Note Valentine's Day Bunting free tutorial on how to sew 14 pouches, each with a love note, for each day leading up to valentines-  lilluna.com

Love Birds embroidery pattern by polka and bloom- magpiepatterns.com

Tuesday, 14 January 2014

Cute Flower Needlecase


Here is another needlecase that I have made, and maybe my favourite one! It will make a really cute and girly gift for a friend who sews or is learning to sew. It is fun and simple to make, and only takes a little time. Fill it with needles to complete the gift! And you could always give it to yourself, I mean, could you bear to part with it?!


The needle case is essentially a fabric sandwich. The front circle is made of two pieces of cotton stiffened with interfacing and sewn together with blanket stitch around the edge so the inside looks neat and you cannot see the wrong sides of the fabric. I appliquéd the leaves and sewed the button onto the front piece before joining the two pieces. Two pieces of white felt for holding pins and needles are in the middle of the sandwich, and to finish there are two more circles of cotton sewn together like the first. To secure, layer up the sandwich and sew along one small section of the side to bind all pieces together.


Tip: Stiffen the fabric shapes for your appliqué with iron-on interfacing and join it with bond-a-web before sewing around the edges. 

Wednesday, 18 December 2013

{Christmas Gifts} Posh Hot Chocolate in a Jar


So there is only one week to go until Christmas! Perhaps you've had all your presents wrapped and ready for a while now, but who doesn't have a few last-minute gifts still to prepare? I've an idea for a hot chocolate gift a few times, and yesterday I had to opportunity to fill a jar myself. It was very easy and quick to make, and a lot of fun too. And it would make a wonderful gift because it's been handmade and presented with love and care. It will keep for a while too because all the ingredients are dry and sealed in the jar. 


Basically, you layer up sugar, cocoa powder, milk powder and finally chocolate and mini marshmallows in a clean sterilised jar and add a tag explaining how to use it. You can add a sticker label, ribbon or raffia, and a gift tag to make a sweet gift even sweeter! It would be worth making several jars at a time as you will always find someone to give them to.

Posh Hot Chocolate In A Jar

Approximate measures per jar:
2/3 cup granulated sugar
An empty jam jar, clean
2/3 cup cocoa powder
2/3 cup milk powder
1/3 cup dark chocolate
1/3 cup white chocolate
1/3 cup mini marshmallows

•    To sterilise your empty jar, put it in the dishwasher or fill it with boiling water and then drain after a few minutes. The heat will clean and kill germs. Dry the jar thoroughly.
•    Take 1/3 cup (or a heaped tablespoon) full of the sugar and carefully pour it into the bottom of the jar. Gently shake the jar so that it settles in an even layer.
•    Next do the same with 1/3 cup cocoa powder, and then 1/3 cup milk powder. Make sure they form fairly even layers.
•    If you have only reached half the height of the jar or less, repeat the pattern once more, so you have six layers.
•    Chop the chocolate finely and layer it on top of the last layer of milk powder. Top with the mini marshmallows. 
•    Decorate as you wish, and add a tag or label with the following instructions: Shake or mix the contents of the jar together until combined and return to jar. Add five teaspoons to a cup or hot milk or water and stir for a delicious cup of festive hot chocolate!

Monday, 9 December 2013

{Christmas Food} Mini Meringue Kisses


Hello again! I hope you are enjoying your Advent and finding lots of inspiration… just like I have, with these Mini Meringue Kisses. These would make a really sweet gift presented in a cute box or jar for Christmas. They also make good snacks for those little sugar cravings (not sure if I'm meant to own up to that though!) I made them for a little tea party my sister and I held and they went down really well with our guests. I can see why: they are very visually appealing and taste very sweet!
The recipe is found here on the Good Food Channel. I found that the instructions could have been more thorough and the first batch I made in green didn't work. So I'm writing my slightly changed version here.

Mini Meringue Kisses

3 large or 100g egg whites
100 g caster sugar
1 tsp vanilla extract
100 g icing sugar
pink, blue or green or yellow liquid food colouring

•    Preheat the oven to 80C/60C fan/gas mark ¼. Line two large baking trays with greaseproof paper.
•    Before you start, make sure that the bowl you are using is completely clean and grease-free. Put the egg whites plus a pinch of salt into the bowl and start whisking at high speed with an electric mixer.
•    As the egg whites are stiffening, slowly sprinkle the caster sugar into the mix. Keep testing the meringue to see if it is ready, it should form stiff peaks and hold still if you pick it up and hold it over your head!
•    Add the vanilla extract and slowly fold the icing sugar into the meringue mixture using a rubber spatula. Be really gentle and careful not to deflate the mixture and lose all the air you just put into it! 
•   Separate the meringue mix into three equal parts. Keep the first white, and add a few drops of your desired colour into the others. Slowly and carefully swirl the colouring around with the end of a teaspoon. 
•   Place a star nozzle in to three piping bags then fill each one with a different coloured meringue mixture. Pipe little circles about 1-2cm in diameter onto the baking trays lined with greaseproof paper.
•   Place the meringues in the preheated oven for between 2–3 hours or until they have fully dried out. 

Wednesday, 27 November 2013

Graze {A Free Gift For You}


 Okay, so this is first post for what… over a week. Trying to finish writing a novel is my only excuse right now. Sorry. So I'm kind of pleased that this post will help me feel better and more like a good blog writer who keeps it all up and inspirational, and hosts giveaways. Because this is better than your average giveaway… everyone gets something. Something yummy and fun from graze.com!
Let me explain. Graze is a company which sends lovely boxes of better-for-you snacks in the mail so that you can enjoy them at home or work, or send one to someone you love. There are 100 small nibbles to choose from: seeds, nuts, dried fruits and chocolate mixes, dippers, heather cakes (that come with a tea blend made to go!) and the graze brownie. You receive four different snacks in each box and can control which ones you are sent by rating the foods as to weather you hate, like, or love each one.
So, for the good part: you can get one free box when you sign up using my friendcode!
Just click here to get your free box. Complete the sign up process to receive a little gift from me!


Disclosure: When you sign up you will have to give card details though they won't take any payment from you. Graze will automatically send you weekly boxes which you will be charged for unless you cancel deliveries after you receive your first box, which is fine. I have not been sponsored or asked to write this, just thought I'd share the love!

Friday, 1 November 2013

Embroidery {Psalm 106 vs 1}


During November I am trying to write a novel! Crazy, I know, but it was NaNoWriMo young writer's program that inspired me to do it. Because I am now going to be writing like crazy, I will not be able to post so regularly, so I'm starting off with some projects I've completed earlier and saved for a times like now! : )
I finished this embroidery in time for Mother's Day earlier this year as a gift to my mum. I really liked doing the embroidery, but like most of my gifts, it was a bit of a stretch to get it done in time! I worked on this watching a movie, at a friends house, and at any spare moment I got in my room. 


I can't remember why I picked this particular verse, probably just because I liked the words. It mentions the Lord in every line, and also his goodness and mercy. I hope it is reminder to praise the Lord and give Him thanks to everyone who sees it in our living room! My mum chose this nice frame, the glass of it measures 7.5" x 9.5" to fit the  fabric.


I chose a large piece of thick white cotton and used embroidery thread for everything except the tree, merely because I had no green embroidery thread! Using an ordinary (HB) pencil I lightly sketched the design onto the fabric after practicing a few times on paper. I started with the tree outline, then the words, and finished with the flowers at the bottom and the tree trunk detail. It is all done in running stitch, where a would sew around the word or an individual letter once, then go back and fill in the gaps. I used two or three strands of the thread and an embroidery needle. I put the fabric onto an embroidery hoop to make it easier to work with. I filled the tree top with simple (almost) straight lines of running stitch.  I'm sure there are many other stitch techniques that could work, I'm not saying this is definitely the way to do it! 


Here is the back, not very pretty, but I just wanted to show how I folded the edges in (to neaten the front and make it fit in the frame,) and then iron over interfacing to help it keep the right shape. It's really hard not to have a few wrinkles though! 

Monday, 9 September 2013

Heart Needlecase

Needle-cases make sweet gifts for those who sew, and are quick to make. Give them with a set of sewing pins or needles and your gift can be used straight away! You can add embellishments and decorative stitches to make something unique. It is also a perfect project for a sewer who is starting out, as something so easy produces nice results! 


I used two pieces of coloured felt for the front and back of the case, and two pieces of white felt to hold the pins or needles. Cut them together using the same template so that they are all the same size. Before you sew them together you can decorate the front. Here I stitched a small heart of pink felt onto a larger heart of Aida (fabric used for cross-stitching) and sewed it onto the front. A small line of stitching at the side will hold it all together and allow it to open out flat. Now all you have to do is decide weather you can bear to part with it!

Thursday, 15 August 2013

Fabric Covered Notebook

I have been making these notebooks as gifts for a while now. This is a project I always return to: it's quick to make, looks cute, a gift to suit anyone, the supplies are easily available to me and I can send it in the post. So, now I'm sure you're dying to see how it's made ; P here's a tutorial!


First, you'll need this stuff:

a blank white A6 card
A piece of fabric about 2" larger (on all sides) than your card
3-5 pieces of A4 paper
Sewing machine
Long arm stapler (I'll talk about alternatives later)

Iron the fabric and cut to size, using the card as a guide. Fold the edges into a hem, by folding each fabric edge up to the edge of the card, and then folding both layers over the bottom of the card. Fold 2 opposite sides first.

Now sew along the edge of the card to secure the 2 sides. Fold the other 2 edges and sew,  trying to meet the ends of your other sewing. 
Sew around the edge of the whole card in a continuos line, with the front facing up as you sew. Fold the card along the fold line.
So, all you have to do now is secure the paper into the notepad. Cut each piece of paper in half, then fold in half. When choosing how many pieces of paper to include, remember, each piece of A4 paper makes 4 pages. I would recommend having no more than 20 pages. 
Put the papers into your cover, and you will see that the ends of the paper stick out further than the cover. You can choose to ignore this, or carefully trim the edges down to fit the cover.
Last thing to do is staple in the pages with 2 staples along the spine of the book. Staple from the top of the book so that the sharp ends are hidden inside. You could sew in the pages rather than stapling, but you'll probably have to use less paper to make it go through the machine!


Variations
You can use only coloured card for the cover instead of covering it with fabric. 
You can cover your pad in two fabrics by cutting each piece of fabric to half the size of the notepad, plus the 2" hem. Lay the fabrics, right sides together, and sew along one long edge. Iron the seam open and use as in the instructions. 
Decorate the cover by appliquéing on other fabric shapes before using to cover the notebook.


Tuesday, 16 July 2013

Girly Gift Pouch


This year I have decided to sew most of my gifts for other people. My younger sister is going to be 11 and I wanted something to suit her. It tried to make shorts but it was way harder than I had anticipated so I settled for something easier. First I thought pencil case and then I was told about this lovely tutorial on the blog Flossie Teacakes. I made this pouch for my sister to use as a small pencil case or a make up bag. I put some hair clips and bands and some sweets into it before I wrapped it up. 
Maybe you know someone who would like this as a gift?